Pizza crust experiment

Last night I decided to make pizza for my NYE party.  I made two batches, enough for six pies. I usually let the dough proof in the oven set to 110F with a small bowl of water.  This time, I tried something different.

Batch #1

I put with a warm dish of water, wrapped securely in saran wrap and left it on the counter.  The temperature of the water when I added it to the yeast was about 130F, a little high. I added about 1/4 C more flour than what the recipe called for as it was sticking a little. When it finished proofing an hour later, the dough was at least double the size. I didn’t put too much flower on to prevent sticking, but it didn’t stick at all when I removed it from the wrap. Usually it sticks like crazy. The dough was very pliable and stretchy, no problem with getting a thin crust.

Batch #2

I did not use a dish of warm water, just securely wrapped it and left it on the counter. The temperature of the water when I added it to the yeast was definitely more than room temp but less then 100F as it was still warm.  I also added half cup more flour as the previous batch was a little wet. When it finished proofing an hour later, the dough increased in size, but not double.  It seemed a little dried out. It was hard to handle and I couldn’t get it as thin as the last batch.

Lesson learned. Proof with some warm water under saran wrap. Have the temp of the water for the yeast a little higher then recommended as it goes immediately into the mixer. No sitting for 10 minutes like my other bread recipe. Oh, and watch how much additional flour is added.

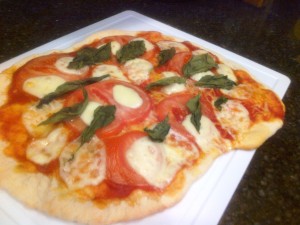
Pizza Margherita
Pizza Margherita
pizza blowing
Blowing underneath the crust to prevent sticking to the peel

A shout out to my two “Sous” chef sisters who helped me last night.

Coconut Cream Flop

I love coconut cream pie.  I like making pie crust a lot less.  However, I have achieved a mild degree of success over the holidays with my sister’s help and a food processor. I am of the opinion that the altitude in Calgary causes problems with the crust.

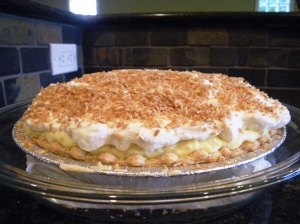
Onto the filling. I’ve made it successfully a few times before, but I made two major mistakes in this case.  The recipe called for 3/4 C of whipped cream to be folded into the filling and 1 C for the topping. I used my ginormous (is that even a word?) 5 quart KA Professional, but found the bowl too big for 3/4 of a cup.  So I decided to save time and make both batches together. Mistake. My custard did not set. I should have hauled out the old Westinghouse mixer with the smaller bowl that takes twice as long to whip. Oh… and looking back at the recipe, since I was too lazy to get more butter I substituted 2 tbs of ghee.  Maybe that is what did it.  Oh well, it still tastes great but I will be going to Plan B.  More details to follow if I manage to execute it correctly.

Update. I went with a coconut cream parfait instead.  Put a layer of graham cracker crust on the bottom of a wine glass. Poured the filling over, topped with a dollop of whipped cream and sprinkled with toasted coconut.  It was really popular at my New Year’s Eve party!

By the way, the recipe is from Wanda’s Pie in The Sky.  Fabulous cookbook.

Sigh... didn't make it past the filling
Sigh… didn’t make it past the filling
Crust needs some work
This is what it should have looked like...
This is what it should have looked like…

Sea Salted Caramel Cookies

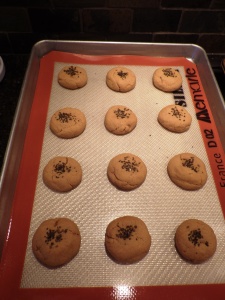
I got bored with the usual flavors of holiday cookies. So I went to a recipe that I have been trying to perfect for the last year. I used Kraft caramels and halving them did wonders. That is, it prevented the cookie from exploding due to overbaking. Black Hawaiian lava sea salt is great to top it off with. Vanilla pudding rather than butterscotch works well too.

Black Hawaiian lava sea salted caramel cookies

Recipe courtesy of ittybittybakes.

Wanda's Pie In The Sky

I love sweets. Some more than others. I could have homemade pie three square meals a day.  I discovered this lovely little place when I was in town a couple years ago.  I did not have a chance to try their wares, but I did buy their cookbook.  I’ve made their coconut cream pie a couple of times and it is delicious.  So this time, I had to try their food.

Veggie pizza and roasted butternut squash soup

The homemade pizza and soup were very good. After arriving in town, it was the perfect comfort food after a hectic day of travel. But, I came here for the pie.

Coconut cream pie

I bought the 6″ pie. The filling was lovely, but the amount of whipped cream overwhelmed the rest. I should have gone for the full sized pie. Everything is fresh and homemade. Next up, sour cherry.

Sour Cherry Pie

The sour cherry was tart as I would have expected. Very good. If I wasn’t leaving town tomorrow, I would have bought at least a 6″.

They do get busy at times, but they are very good about asking people to lineup as most just stand around gawking at the pie case. I can say that is one of my favorite places for pie. Warrants mutiple repeat visits.

Wanda's Pie in the Sky on Urbanspoon

Pizza

Ah, my pizza technique is improving.  Managed to get the dough in some places as thin as a cracker.  Didn’t proof it in the oven, definitely less air bubbles. Have to work on making a circle though.  Topped with naturally raised ground beef, mushrooms, pesticide free yellow pepper, mushroom, pesticide free tomato, red onion, sorrel, freshly picked basil, dried oregano and stretchy mozzarella.

Red bean paste buns

Everytime I make this, it usually gets better.  It was a hot, slightly humid day when I made these yesterday. Let it proof on the counter rather than in the oven. Resulted in dough that raised nicely with a nice round shape for the buns.  I had some almond milk on hand so I substituted it for the milk. Voila, lactose free.

IMGP0008_rz

IMGP0014_rz
Making bao is time and labor intensive so I usually double the batch.  I have a three quarter sized sheet pan and it works wonders.  Using two half sheets means that I have to open the oven and rotate halfway through baking.

Makes 20 buns

Ingredients for buns:

Single batch (makes 10 buns)

  • 11 ml dry yeast (1 pack)
  • 2 tablespoons sugar
  • 2 teaspoons vegetable oil
  • 1/3 cup milk or almond milk for dairy free
  • 1/2 cup hot water
  • 2 cups bread flour (can use all purpose instead)
Double batch

  • 22 ml dry yeast (2 packs)
  • ¼ C sugar
  • 20 ml vegetable oil
  • 2/3 cup milk or almond milk for dairy free
  • 1 cup hot water
  • 4 cups bread flour (can use all purpose instead)

Ingredients for brushing buns:

  • 2 egg yolks, whisked for double, halve for single
  • Syrup (1 teaspoon sugar + 2 teaspoons water)

Method for making buns:

  1. Put sugar in hot water, let sugar melt completely.  Add milk and oil, mix well. Allow cool to 104F (40C), add yeast and stir well. Cover with a cotton towel for 10 minutes and let it rest. The mixture should look foamy.
  2. Add sifted flour into the mixture, mix well.  I usually use a mixer for a few minutes on low until the dough comes together.
  3. Knead dough until not sticky. Divide dough into two balls.  Can leave that way in a large bowl and tightly cover with plastic wrap. Or form into two logs and put into a large French white casserole with lid. Leave in a warm place to rise for 30 minutes. Can also set oven to bread proof setting or 100F. The dough will be more than double in size.
  4. Cut dough into 10 parts in equal size and stuff with filling of choice. I like using red bean paste but char sui is also tasty.
  5. Brush with egg yolk. Let it have a second rising for 20-30 minutes if possible.
  6. Bake for 16 minutes at 360F. Baking time will vary with oven but you know when it’s done when the tops turn color. Brush with syrup (sugar in water).

Bao recipe adapted from: http://en.christinesrecipes.com/2008/09/incredible-baked-cha-shao-bao-chinese.html#ixzz1HkjcVP6J

Tips on handling the dough

  1. Cut pieces of dough from the roll, four at a time and form into balls. Let sit on the counter for a few minutes.
  2. Using one of the balls, start flattening along the edge with your fingers.  Go around the edge in a circle, finishing in the middle. The finished product should look like a bowl.
  3. Fill with the filling.
  4. Start pinching the edges together in a circle until the edges are closed.  When finished it should look like a wonton or those appetizers that look like purses.
  5. Twist the top to seal and push into the bun. This will become the bottom of the bun.  When left to rise for at half hour or so, it will fill out and close the gaps.

Fillings

Char Sui Bao

BBQ pork bun.  Pretty easy to find a recipe on the web.  I tend not to make these as often is it is a lot of work to make the char sui and then cool, cut and stir fry.  But boy is it tasty.

Dau Sa Bao

I usually use the store bought red bean paste but I sometimes make my own using the following recipe.

http://chinesefood.about.com/od/dessertsfruit/r/redbeanpaste.htm

Lean Yoong Bao

Lotus seed paste bun.  I buy it from T&T but I find it’s a bit sweet.  If I could find the ingredients I would make it from scratch.

Kai Mei Bao

Cocktail buns. This uses a mixture of shredded coconut (I prefer unsweetened) and melted butter.  I don’t have the proportions but make sure that it has a paste like consistency.

Ga Lei Bao

Curry beef bun. I used a recipe adapted from the following:

http://www.cooks.com/rec/view/0,161,153191-250203,00.html

Make sure that the filling is dry and not wet. Otherwise it will leak while baking.

I’ll add some pictures the next time I bake.